An Intro to Git and Its States
When I first started working in git I found myself frequently asking the following:
Why does it seem like whenever I want to remove something in git, I do it wrong?
This is a common feeling. Git has many states that can be subtle and confusing. This post will take you on a thorough and detailed examination of the different states; useful commands and examples will be explored to help you change states more confidently and effectively.
Here are the two problems we will be examining:
- The unkillable zombie file that is somehow immune to
git reset --hard - Removing accidental commits without polluting your history
Before we start, here is a simple graphic from this insightful article about recording changes.
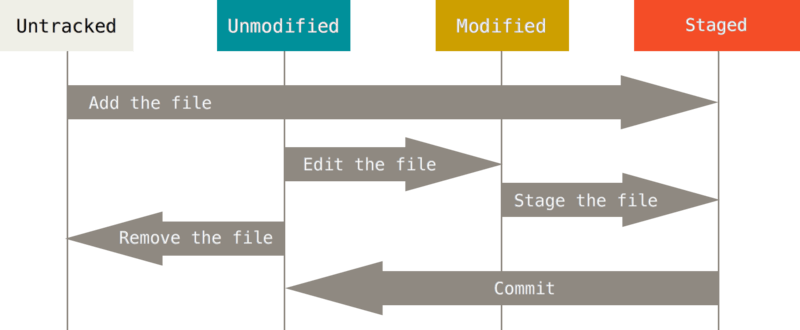
The article that the above graphic was pulled from is detailed and extremely useful to someone who is familiar with the git vernacular. However, if you don’t know the technical jargon, it can be a bit overwhelming. I am going to illustrate some situations that I found particularly confusing, and share with you the flowchart I use for navigating the stages of git!
Here is my flowchart for adding changes:
And here is my flowchart for removing changes:
The Unkillable Zombie File
Copy and paste the following shell commands to follow along:
mkdir ~/unkillable-zombie-file-demo &&
cd ~/unkillable-zombie-file-demo &&
git init &&
touch some-new-file.txt &&
git status
Sometimes you are making changes and realize you don't actually want anything you just did. A reasonable command you might issue is git reset --hard and usually this will work, unless you have an untracked new file. Run the following command to see what I am talking about:
git reset --hard && git status
This is the first “wat” moment in git as git status will tell you that some-new-file.txt is still around. My first experience with this was unsettling because I thought reset --hard was this all powerful command of destruction. Oh, how I was deceived!
Reset only works on files that have already been committed; this is the command you really wanted:
git clean -df && git status
This will remove any files that are not tracked by git and remedy the issue you are seeing. The -d flag means directories and -f means force, which you need to use when removing files or folders with clean. Alternatively, there is nothing stopping you from doing a good 'ole fashioned rm of the file that is hanging around.
A simple git alias I recommend adding would be pristine:
git config --global alias.pristine '!git reset --hard && git clean -df'
Removing Accidental Commits
Let’s set up this scenario:
mkdir ~/committed-the-debugger &&
cd ~/committed-the-debugger &&
git init &&
touch main.js &&
echo some code >> main.js &&
git status
At this point we have a new file with some text in it. We want these changes, so let’s add them.
git add main.js && git status
Now our changes are staged and ready to be committed!
git commit -m “Added some code” && git status
Woohoo! We have now associated these changes with a commit hash (a.k.a SHA), which we can see by running git log.
We quickly realize that our code has a bug in it, so we add a debugger and add some more code to fix it.
echo debugger  >> main.js &&
echo some more code >> main.js &&
git status
Since we are in a rush, we blow past the add command by using the -a flag and commit this code... along with the debugger.
git commit -a -m “more code” && git status
Yay! Bug fixed!
Oh wait... We forgot to remove the debugger! Drat! How do we go back?!
This is where the reset --soft command becomes useful.
This is only true if you haven’t pushed, if you have pushed this commit, you will need to force push. This is very dangerous and should only be done if you don’t have others relying on this branch
What reset takes in this case is a SHA you would like to revert to. Generally, this can be done by using git log to copy/paste the commit hash we would like to use. In this case, since we know we would like to go up to the next parent, we can specify this with HEAD^1.
git reset --soft HEAD^1 && git status
And voila! We are back to when everything was staged and ready to be committed. So let’s remove that debugger and commit what we actually want.
~open favorite text editor to remove debugger from main.js~
git add -p
I have opted to use the -p aka --patch flag as it forces me to review my changes in patches before I move them from staged to committed. If I would have done this instead of using git commit -a -m I probably wouldn’t have gotten myself in this mess in the first place!
Looks like this is what we wanted, so let’s commit it!
git commit -m “add code to address X issue” && git log
We should see only two commits here, and thus an unpolluted commit history. Yay!
Some takeaways from this scenario:
- Using the
-aflag in some cases can cause us to commit things that are unrelated. - Adding with the
-pflag makes you think about what you want to move into the staged area and makes sure it is related.
Conclusion - Remotes
Git isn’t an easy tool to understand, and these are the basics of working with the different states of tracking, modifying, and staging your changes. One important thing to note and make abundantly clear is that this does not cover remotes at all and when you have changes on a remote, reverting becomes more difficult and dangerous as it can sometimes require a git push -f aka a force push that will rewrite history. However, if you understand the basics of making these changes in local history, jumping up to that next level of remote history will be much easier!
If you found this interesting or just want to talk about git, find me on Twitter @mghinrichs.
Thank you for reading!